Watercolor Travel Palettes and Kits

Vail, AZ 

Feb 25, 2022


I love gear!


I especially love small really clever gear.  So, it follows that I really love putting together really useful, easy-to-carry travel sketching kits.  I now have more than I could possibly ever need, but it also means that I really don't have any excuse not to sketch when I'm out and about as I can stash a sketch kit in both vehicles and every handbag and even my pockets.


First, the palettes


I prefer palettes that have full/half pans that can be replaced (as opposed to built in wells for the paint).  With replaceable pans, I can easily swap out colors to suit the situation.  I have so many small travel palettes, that I'm now trying to fit them out with a color range to fit the locations I'm sketching - for instance, the colors I'm likely to use in a Southwestern landscape is quite different than one for sketching the oceans and forests of the Pacific Northwest.

My studio palette is a massive porcelain beauty - but, of course, not at all suitable for moving around - it's heavy, breakable, and messy - no cover except tor the glass I cover it with to try to slow the paint drying out.   The porcelain is lovely to mix on, there are lots of wells for paint and two really good sized mixing areas.


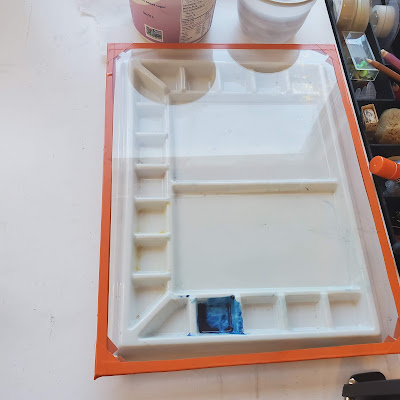
Really clean at the moment!


I have a couple of mid-sized folding palettes that I use primarily (now, they used to be my primary palettes) for workshops where I know I'll be using a lot of paint but not moving around too much.  

They work pretty well - but even the one with the sealing lid does leak.  They have the advantage of being easier to carry around, lots of wells (but not replaceable pans), and they are inexpensive, easy available and lightweight.


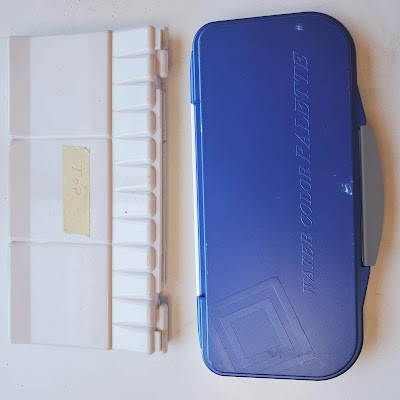
Folded, these are about 5"x11"


These next ones are really the most useful for urban sketching and travel sketching.


My absolute favorite is the Winsor and Newton Travel Watercolor Kit.  I've had mine for almost 40 years.  It is sold with either Professional W&N watercolor half-pans or W&N Cottman (student grade) paints.  Generally, I don't like pre-loaded palettes - the colors they choose to include invariably include several that I don't use (for instance, I never use black watercolor, and, if I'm going to need white paint - a gouache white performs much better than a watercolor white).  Unfortunately, this W&N kit only comes with paint - I'd advise getting the Cottman set and just replacing the student grade pans with your own choices.  I wish they sold it empty!

By adding a couple of half pans, you can fit in an extra 2 colors, bringing your total to 14!  Part of the cover pops off to provide a water container, and there is a small plastic bottle to carry water incorporated into the kit.  They also provide a truly useless teeny, tiny itsy bitsy brush.  The mixing areas are a bit fragile feeling - but, in 40 years, I haven't had mine break.  The plastic hinge on the middle tray of paint pans did break - but it doesn't really make a difference.


I've stored a color swatch ID of the paints underneath the water container.


Really, just the cutest thing!! approx 2.5"x1.5"x5"


My next favorite is this Honbay metal palette. These are made by a number of companies and are relatively inexpensive.  You can also buy empty half=pans on Amazon quite cheaply (I got like 50 for about $10).  I'd really love it if it had 3 mixing areas - but, at the time I was looking, the one with 3 mixing areas was like triple the price.

With a little creativity, you can mix and match full pans and half-pans - this is a huge advantage as I think everyone has 2 or 3 go-to colors that will get used up quickly - so it's really nice to have a few full pans in your kit.  I wedged 15 half-pans and 3 full-pans into this kit.


Here's another W&N field kit - I'm not sure it's being made anymore, but they have similar models filled with the cottman paints for around $20.  The tiny brush is useless, the clip-on water container is a joke, but it does have a pull out mixing tray on the bottom which really increases the already generous number of mixing wells.  Also, the thumb-hole is actually functional, unlike most of the rings that all the other travel palettes have (I find that the rings are very awkward to use!)


In terms of cuteness, the Micro Portable Painter is in a dead heat with my old W&N kit - except that it's MUCH tinier  - squeeeee!  SO CUTE.  Yet, so functional - 6 half-pans, 4 little mixing areas and a generous water cup.  It comes with a felt carrying bag - :) otherwise, you might just misplace it.


Folded up, this is approx 2.25"x2.5"x1" - truly pocket-sized!


Then we have the homemade DIY options!!


There a million DIY'ers out there with very creative ways to fill an old Altoid tin with watercolors.  Basically, you need to stabilize your half-pans in the tin somehow - I use that blue tac stuff to stick them in place, but you can also use double sticky sided foam tape, or flexible sheets of magnetic tape (I've up-cycled old magnetized business cards that appliance companies hope you will stick on your fridge for future reference).

Here are 2 that I've constructed.  They do rust out eventually, but they're easily replaced.  Or, take a look on Etsy - there are some DIY'ers that have spent a lot more effort and time to make some really nice versions!


I've used a water bottle cap for a small water cup, and sacrificed some space to hold a folding brush.


I've glued a color swatch on top Identifying the colors in the box.

 
In this one, I used a tiny Altoids tin.  It still fits 4 colors and I can put it into in my pen bag for quick every day sketching.  The pen bag has a couple of water brushes that I use instead of carrying water.  It still fits 5 half-pans!  


I carry this palette with a very strong magnet on the bottom.  By placing the magnet under a couple of sheets of my sketchbook, the tin will stick to the page - making it very convenient to used while sketching on location in a sketchbook!!


Even almost upside down, the magnet holds this little palette tight!!

The rest of the kit!!


All of the small palettes fit into sandwich sized zip-lock bags.  I add paper towel, a travel brush or two, and a small cosmetic spray bottle (to activate the watercolors) to complete the watercolor kit.  A small pencil bag with pens and pencils and my sketchbook complete my basic travel sketch kit.  I usually stick these supplies into a shoulder bag or a day pack with the usual water bottle, hat, sunscreen etc. that one would normally carry on any day trip.  If I'm really ambitious, I might take a very light folding stool.

Self Portraits

 Vail, AZ

18 Feb, 2022


It's hard to find models . . . 


Georgia O'Keefe once said that she painted flowers because 'They're cheap and don't move".  I find it difficult to find models - I do used photographs off the Net for practice, but, if I want to paint for a show, copywright issues come into play.  So, I tend to just use my own face.  Plus, to paraphrase Georgia - I'm always available and come cheap!.

Self-portraits over the years


I don't have too many sketches from my early years - too much vanity as a young person over my appearance.  Now that I'm old and don't care, I actually find it fun to draw my wrinkles, age spots and sagging jowls.


This is the earliest self-portrait that I still have.  This 8x10 sketch was done from a reference photo of me as a middle-schooler and was done in my early 20's.  My typical pen and ink (on cheap drawing paper, which, over 40 years, has yellowed and become crumbly - an object lesson in what happens when you don't use artist quality materials).


This small pencil sketch was done quickly one evening while I was watching TV and realized that I could see my refection in a nearby window. This was done about 20 years ago - early 2000's.


This 9x12 pencil sketch was done on toned paper and also by laying down a layer of charcoal first.  Then the face was 'sculpted' by adding darks and pulling out the lights with an eraser.  I used a photo of me in my early 30's as a reference, and the sketch was completed in 2020.


Another sketch done on toned paper, this time using soft graphite for the darks and white colored pencil for the lights.  This is a 9x12 sketch also completed in 2020, done live (looking into a mirror).


The self-portraits continue


Blind or semi-blind contour drawing is a great way to improve hand-eye coordination and provide a stress-free warm-up. So, one aspiration for 2022 is to do a quick (~2 minute)  small (3.5x5.5) semi-blind contour self-portrait as a warm-up exercise EVERY SINGLE DAY.

I started this in December 2021, but already I can see the benefit.  Here's one of the first one's I did with one I did after about a month of regular sketching.  I'm finding that doing these quick sketches is enormous fun and I really love the quirky results!!


I'm finding that my goal of doing one of these little sketches daily is more aspirational than achievable, but I'm still finding them valuable and just a whole lot of fun - hard to think of new poses though.

30 Faces 30 Days: 26-30

Vail. AZ 

11 Feb, 2022


Day 26


I did this one mostly in charcoal on a toned paper; I am getting so tired of graphite pencils!  They tend to be very shiny under my studio lighting, which makes it very hard to see.  This muse was kind of fun to draw with his funny expression.


Day 27


Finally - a mature woman!  For this challenge, fully half the models were young women; the other half men (young to old).  As an older woman (much older than this model), I feel somewhat under-represented!


Day 28


This young woman in costume was fun to sketch.  I did her bow in somewhat a stylized manner (so did the artist doing the demo) - mostly because in the reference, she was holding it out in this way.


Day 29


This use of watercolor washes with pen is a familiar technique for me, so I was pretty comfortable with this sketch.  I liked that the demo artist suggested cropping the image for a more dramatic composition.  Also, working from a toned paper let me get some nice, white charcoal highlights.


Day 30


Another whimsical model.  I needed to make the flowers much more vivid to balance his beard - maybe next time.


I'm glad that I did this challenge but I'm also glad it's over!  It took a big chunk of time over the last month.  Going back over the month, I see that I have some areas to focus on:
    - Backgrounds - I rarely put in a background unless prompted to my the artist doing the demo - so most of these portraits seem unfinished.
    - Composition - Only once did I alter the composition to make a more dramatic portrait.
    - I often got bored or lost focus towards the end of my sketch and didn't really finish off the portrait. I need to remember to come back and finish work (doesn't have to be finished in one go).

Overall, I learned a few things about media that I use often but not to their full range - always a good thing.

30 Faces in 30 Days: 21-25

 Vail, AZ

4 Feb, 2022


2/3 of the way through this challenge!


All my chores are sliding; I'm spending a lot of time in my studio and not much else is getting done.  So, I'm having fun but spending this much time every day is getting to be a bit of a slog.  I think it's showing in my focus (or lack there of!).  I had trouble with several of the pieces this week - either getting frustrated and not really finishing them, having accuracy issues that I didn't discover until too late to correct or other problems that left me unsatisfied with the sketch.

Day 21


Not too bad as I look at it now - but his nose is a bit big, and the cross-hatching is pretty rough.


9x12 pen with watercolor wash


Day 22


This was an interesting character to draw!  I liked doing the wrinkles in his forehead and the shadows around his eyes.  I got tired and didn't fully resolve his hair so that's pretty sketchy.  Also, had trouble with the shape of his mouth and handlebar mustache.  I think he looks like a magician!


9x12 Graphite


Day 23


I was initially excited to draw this guy - he looked like a dancer to me.  But, this is one of the first time I've tried to draw a figure directly with ballpoint pen - no pencil block-out first.  I had a heck of a time getting the ballpoint to shade lightly (I didn't buy the special $9 ballpoint pen that the demo artist was using).  I wasn't paying enough attention to the eyes (focus . . . focus . . . ) and got them too dark.  I could have used more darks on his hand - although I'm pretty pleased with how the hand turned out.


9x12 Ballpoint pen


Day 24


I thought I had this face pretty well mapped out before I got into the detail, but then about half way through, I took a break.  When I stepped back, I noticed that the right eye was situated to high!  I managed to erase it and place it lower so that it matches the left eye more closely.


9x12 Graphite Pencil


Day 25


My favorite of this set of 5!  Pen and watercolor wash - my comfort zone.   Plus, I really liked this model - those lips!


9x12 Toned Mixed Media